As with writing mathematical documents, the best way to create websites is to keep the content separate from the styling. HTML is used to specify what goes on the page, and this is separated out from how the page should look. The look of a page is controlled by a cascading style sheet (CSS) file. This is like how the LaTeX file contains the contents and the document class determines the look. This approach makes creating pages much quicker, and allows for a complete change of style easily.
If you view the source for the course webpage, you will find plain HTML – headings, paragraphs, images and tables – but no commands for alignment, colour or size. Instead, there is a line in the head of the document
    <link rel="stylesheet" type="text/css"
    href="css/course_pages.css"/>
which tells the browser to use the CSS file at the relative URL
css/course_pages.css.
The CSS file consists of a list of style specifications.
    html {
        background-color: #fff;
    }

    body {
        font-family: "arial", "helvetica";
        color: #423;
        background-color: #ffffe4;
        border-color: #423;
        border-style: double;
        width:700px;
        ...
    }
Each of these specifications takes the form
    selector {
        property: value;
        property: value;
        ...
    }
The simplest type of selector is an HTML element selector which corresponds to HTML elements created using the HTML element tags. The selectors html and body come in this category, as do p, img, h1 etc.
It’s easy to understand what a lot of the properties correspond to. For example, the background-color property changes the background colour of the element. Hence,
    html {
        background-color: #fff;
    }
tells the browser to format everything that sits between the <html> and </html>
tags with background colour #fff, which means ‘white’ (see later). This gives the
course webpage its white base colour.
Similarly,
    body {
        font-family: "arial", "helvetica";
    }
tells the browser to use the font Arial for everything in the body of the document
(that is, between the <body> and </body> tags) and Helvetica if Arial isn’t
installed on the user’s computer.
We will play around with CSS selectors, properties and values in the lab.
There are 140 named colours in HTML and CSS. These include common colours
like black, red and darkblue. For main heading which are dark blue text on a
white background you can use
    h1 {
        background-color: white;
        color: darkblue;
    }
However, in general, not all colours you want will have names and you can’t necessarily remember all those names, so referring to colours numerically is more common. This gives you access to over sixteen million colours.
The standard way to specify colours in CSS is to use hexadecimal numbers. Hexadecimal is the number system in base 16; its 16 digits are
For example,
Every colour can be made by mixing the three primary colours of light: red, green and blue. We specify colours by giving their red, green and blue (RGB) components. These components can range from 0 to 255 (in decimal); that is, from to (in hexadecimal).
Example. To specify bright red we set the red component to maximum () and the green and blue components to minimum ( and ).
We encode this as the six-digit hexadecimal number
Similarly,
There are lots of colour charts in existence which you find on the web.
Three-digit and six-digit colour codes
You may have noticed that the example we gave earlier (where #fff represented
white) doesn’t quite fit this description. In fact, in CSS the code #fff is
short-hand for #ffffff. Similarly,
#423 is short for #442233
#1ae is short for #11aaee.It is fine to use either the three-digit or six-digit representations for colours as you choose.
So far, the webpages we have created have been offline, that is stored on just one computer. To turn the pages into part of the world-wide web requires the use of a web server. A web server is a computer which allows users to connect to it and access its files. It is possible to set up your own computer as a web server, but it’s more common to obtain webspace (that is, filespace) on a dedicated web server. The web server is often called the host of the site.
The web server (or host) that is used for the MAS116 website belongs to the university.
The URL https://maths-skills.group.shef.ac.uk points to our filespace on
the university’s server. Accessing https://maths-skills.group.shef.ac.uk via
a browser makes the web server return the index.html file inside that filespace,
which the browser displays.
Unfortunately, the university doesn’t offer webspace to students. You might have access to google sites, but that does not allow the use of HTML and CSS. However, there are many companies that offer webspace. Some offer it free in exchange for adverts on your site, others charge an annual fee. You shouldn’t have to pay much money for webspace.
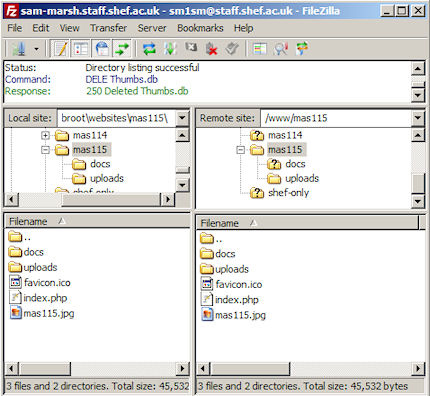
Once you have built a website and obtained webspace, you need to transfer your site to the web server. The most common method of doing this is using file transfer protocol (FTP). Using FTP is easy. The most usual approach is to use an FTP client (for example, Filezilla). After typing in the log-in details for your webspace, transferring the files is a simple case of drag-and-drop. As soon as the files are onto the web server they will be accessible via the world-wide web.
The final step to running a website is to obtain a domain name (such as bbc.co.uk or channel4.com). There are lots of companies that will register domain names online and the registration process is relatively simple. After registering your domain name, it needs to be configured to point to your webspace. Once this is done, your website will be complete! Domain names are not free, but most of them are cheap. There is an annual fee for renewing the domain name, but this is small.
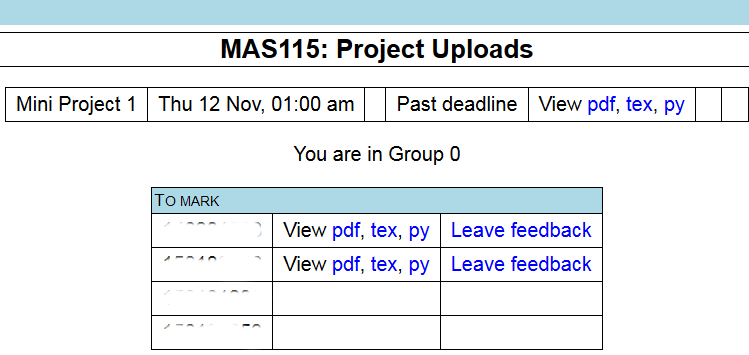
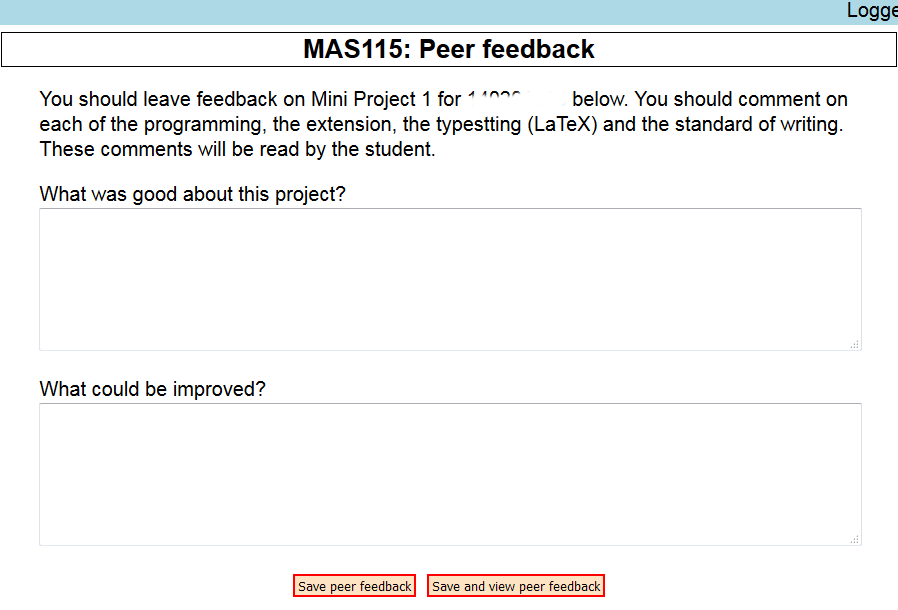
Now that all projects have been submitted, it is your job to read and comment on some of your peers’ projects as part of the peer assessment process. Each student has been assigned 3–4 projects to assess. To view the projects you will assess, log into the upload system:
Here’s what you need to do.
Download the Python files (right-click, save-as) and open them in Spyder.
(Each file might contain several Python programs so look carefully.)
Look at the LaTeX files.
(Note that it might not compile properly as, for example, images files won’t have been included with the upload).
At this stage you do not come up with a mark.
You will receive 2 marks for taking part in the peer assessment. To receive these marks the following are required.
The deadline for submitting the comments is 2pm next Monday (Week 10). Next Tuesday 11am you agree on marks in your groups. We will send an announcement summarizing this process shortly.
In this week’s lab we will experiment further with CSS, getting used to affecting the layout of pages.